How To Make an Animated Movie
Step-by-Step : How to Make an Animated Movie
In this in-depth article, Pratik Gulati walks us through the many stages involved in creating an animated movie from scratch, whether it be the next Hollywood blockbuster or the shortest of short films. So if you're thinking about trying it yourself and want to know how it's done, or even if you're just curious about the process, this article is one you don't want to miss.
The production pipeline of a typical animated short or a movie can be divided into three stages : pre-production, production and post-production. In this article we will be discussing these three key stages in detail.
Pre-Production
The first process in the animation pipeline, and also one of the most important, is pre-production. It begins with the main concepts which are initially turned into a full story, and then, once the story has been finalized, other things such as the script, shot sequence and camera angles are worked on.
Some major components of pre production are Story Boarding, Layouts, Model Sheets and Animatics.
...they also provide a visual reminder of the original plan; something that can be referred back to throughout the production.
Story Boarding
The Storyboard helps to finalize the development of the storyline, and is an essential stage of the animation process. It is made up of drawings in the form of a comic strip, and is used to both help visualise the animation and to communicate ideas clearly. It details the scene and changes in the animation, often accompanied by text notes describing things occurring within the scene itself, such as camera movements.
Not only can storyboards be especially useful when working in group environments (something quite common in the animation industry,) but they also provide a visual reminder of the original plan; something that can be referred back to throughout the production.

Layouts
Once the storyboards have been approved, they are sent to the layout department which then works closely with the director to design the locations and costumes. With this done they begin to stage the scenes, showing the various characters' positions throughout the course of each shot.
Model Sheets
Model sheets are precisely drawn groups of pictures that show all of the possible expressions that a character can make, and all of the many different poses that they could adopt. These sheets are created in order to both accurately maintain character detail and to keep the designs of the characters uniform whilst different animators are working on them across several shots.
During this stage the character designs are finalized so that when production starts their blueprints can be sent to the modeling department who are responsible for creating the final character models.

Animatics
In order to give a better idea of the motion and timing of complex animation sequences and VFX-heavy scenes, the pre-visualization department within the VFX studio creates simplified mock-ups called “Animatics” shortly after the storyboarding process.
These help the Director plan how they will go about staging the above sequences, as well as how visual effects will be integrated into the final shot.
Production
Now that the storyboard has been approved the project enters the production phase. It's here that the actual work can start, based on the guidelines established during preproduction. Some major parts are layout, modeling, texturing, lighting, rigging and animation.
[layout artists] produce the 3D version of what storyboard artists had previously drawn on paper.
Layout
Using lo-res models or blocks of geometry in the place of the final set and characters, the Layout Artist is responsible for composing the shot and delivering rough animation to the animators as a guide. What they produce is the 3D version of what the storyboard artists had previously drawn on paper.
During this stage the Director approves camera moves, depth of field and the composition of the models making up the set and set dressing. It is then the responsibility of the Modeling department to deliver these approved set, prop and character models in the final layout stages.
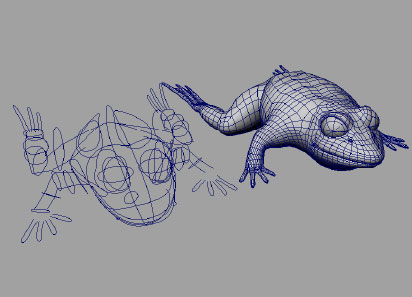
Modelling
Modelers are usually split into two or more departments. Whilst organic modelers tend to have a sculpture background and specialise in building the characters and other freeform surfaces, hard-surface modelers often have a more industrial design or architectural background, and as such they model the vehicles, weapons, props and buildings.
Working closely with the Art Directors, Visual Effects Supervisors and Animation Supervisors, modelers turn the 2D concept art and traditionally sculpted maquettes into high detail, topologically sound 3D models. They then assist the Technical Animator and Enveloper as the model has a skeleton put in place and the skin is developed. Following this, the model may be handed back to the Modeler, who will proceed to sculpt facial expressions and any specific muscle tension/jiggle shapes that may be required.
Once the model is approved, it will be made available to the rigging and texture paint departments, who complete the final stages in preparing the model for animation and rendering. With luck, the model will move through the production pipeline without coming back for modeling fixes, although some amount of fixes are inevitable - problems with models sometimes don't appear until the rendering stage, in which case the lighter will send the model back to be fixed.

Texturing
Whether creating a texture from scratch or through editing an existing image, Texturing Artists are responsible for writing shaders and painting textures as per the scene requirements.

Working hand-in-hand with the surfacing and shading departments, textures are painted to match the approved concept art and designs which were delivered by the art department. These textures are created in the form of maps which are then assigned to the model.

...lighting TDs combine the latest version of the animation, the effects, the camera moves, the shaders and textures, and render out an updated version every day.
Lighting
Not only does a Lighting Artist have to think lighting the individual scenes, they also have to consider how to bring together all of the elements that have been created by the other departments. In most companies, lighting TDs combine the latest version of the animation, the effects, the camera moves, the shaders and textures into the final scenes, and render out an updated version every day.
Lighters have a broad range of responsibilities, including placing lights, defining light properties, defining how light interacts with different types of materials, the qualities and complexities of the realistic textures involved, how the position and intensity of lights affect mood and believability, as well as color theory and harmony. They are required to establish direct and reflected lighting and shadows for each assigned shot, ensuring that each shot fits within the continuity of a sequence, all the while aiming to fulfill the vision of the Directors, Production Designers, Art Directors and VFX Supervisors.
Rigging
Rigging is the process of adding bones to a character or defining the movement of a mechanical object, and it's central to the animation process. A character TD will make test animations showing how a creature or character appears when deformed into different poses, and based on the results corrective adjustments are often made.

The rigging department is also involved in developing cloth simulation – so as well as making a character able to clench their fist or rotate their arm, the rigging and cloth department is responsible for making their costume move in a believable manner.

...planning a character's performance frame by frame uses the same basic principles first developed for 2D animation.
Animation
In modern production companies, the practice of meticulously planning a character's performance frame by frame is applied in 3D graphics using the same basic principles and aesthetic judgments that were first developed for 2D and stop-motion animation. If motion capture is used at the studio to digitize the motion of real actors, then a great deal of an animator's time will also be spent cleaning up the motion captured performance and completing the portions of the motion (such as the eyes and hands) that may not have been digitized during the process.
The effects team also produce elements such as smoke, dust, water and explosions, although development on these aspects does not start until the final animation/lighting has been approved as they are integral to the final shot and often computationally heavy.
Post-Production
Post-production is the third and final step in film creation, and it refers to the tasks that must be completed or executed after the filming or shooting ends. These include the editing of raw footage to cut scenes together, inserting transitional effects, working with voice and sound actors and dubbing to name just a few of the many post-production tasks.
Overall, however, the three main phases of post-production are compositing, sound editing and video editing.
Compositing
The compositing department brings together all of the 3D elements produced by the previous departments in the pipeline, to create the final rendered image ready for film! Compositors take rendered images from lighters and sometimes also start with compositing scripts that TDs develope in order to initially comp together their dailies (working versions of the shot.)

General compositing tasks include rendering the different passes delivered by a lighting department to form the final shot, paint fixes and rotoscoping (although compositors sometimes rely on mattes created by a dedicated rotoscoping department), as well as the compositing of fx elements and general color grading.

Sound Editing
This department is responsible for selecting and assembling the sound recordings in preparation for the final sound mix, ensuring lip sync and adding all of the sound effects required for the final film.
Video Editing
Video editing is the process of manipulating and rearranging shots to create a seamless final product, and it is at this stage that any unwanted footage and scenes are removed. Editing is a crucial step in making sure the video flows in a way which achieves the initial goal. Other tasks include titling and adding any effects to the final video and text.
Conclusion
The production pipeline detailed above is broadly common in most studios, however each studio is likely to have a custom pipeline determined by the type of project they are currently undertaking. A 2D production pipeline starts with workbook and goes all the way through final checking, composting and film output, whilst the 3D CGI production process emphasizes the design, modeling and rigging and animation stages. Moreover, animation production is a very coordinated process where different teams of artists work together while utilizing optimum resources and achieving the initial goal in the time available.
ANIME PRODUCTION – DETAILED GUIDE TO HOW ANIME IS MADE AND THE TALENT BEHIND IT!
I think it’s both important and fascinating to learn about the fundamentals of the medium we all love, and one of the most critical questions is: how is anime made? For me, especially recently, that’s been a burning question that I ended up researching in detail. For the sake of other anime fans with the same question, I thought I’d share my findings. So, if you want ammunition to return fire the next time you find yourself caught in an argument about the merits of anime, or want a fresh way to look at anime, I hope this article will be useful. Over the last year or so, my increasing interest in this side of things has really opened my eyes to the talent, artistry, passion and beauty that can be found in Japanese animation. The article will focus on TV-anime production, but the same general process applies to movies and OVAs as well. That said, there can be a lot of variation between studios and individual productions.
The process of making an anime is a complex one, with many steps and stages. This chart from AIC’s English website is a good visual overview for what I’ll be discussing:

The anime production process
Pre-production:
This process depends on who’s pushing for an idea and who is backing it up, it can be animation studios themselves along with sponsors, but many anime are adaptations of manga or light novels, in which case, publishers front costs (including the costs of having it shown on TV stations). The production company (e.g Aniplex) gathers staff, sponsors, and looks at advertisement and merchandise. While many people describe studios as being cheap, only around half the budget is often given to the anime studio, with the rest going to broadcasters and other contributing companies. The broadcast costs are surprisingly high – according to blogger, ghostlightning – at about 50 million yen for a late-night timeslot across 5-7 stations for a 52 episode series. You can see why anime can be an expensive business. For example, Full Metal Alchemist, which had a 6pm Saturday slot had a total budget of 500 million yen (before additional costs).
When the core staff is arranged, they meet and plan out the anime, work on series composition (how the anime will play out across each episode/over the course of the series), and select further staff such as character or mecha designers. One of the most crucial core staff is the director. To understand the role of directors, you could think of them like directors of a movie, but instead of dealing with actors, they deal with the animators who make the characters movie. Their involvement is generally to attend meetings and make decisions in order to manage the schedule, budget and quality of an anime.
Following the early panning sessions, designs (character, mecha, costume, etc) are then created. Designs are obviously an important factor in creating a good anime. Character designers either have the task of simplifying manga/illustration designs so that they are suitable for animation, or, in the case of an original anime, coming up with a new set of characters based on descriptions from the director/producers. Character designers often continue to advise animation directors on corrections to animation that should be made to stay close to their character models (in which case they are generally credited as Chief Animation Director for the series).
Once the story and designs are mapped out, the first episode is tackled.
Production:
The first step is to write the episode scripts. Following the episodes synopsis/plans, the full scripts are written, by either one person for the whole series or by several different writers based on the outlines from the overall script supervisor (staff credit: series composition). The scripts are reviewed by the director, producers, and potentially the author of the original work before being finalised (after 3 or 4 drafts, often). The episode director, supervised by the overall director then takes this backbone of the episode and must plan out how it will actually look on screen. While the director has the final say and is involved at production meetings, the episode director has the most hands-on involvement in developing the episode. This stage is expressed as a storyboard (a visual script), and the storyboard marks the beginning of actual animation production.
Storyboarding:
Often the storyboard is created by the director, this means an episode is truly the vision of that director. But usually, mainly in TV-anime, separate storyboarders are used to actually draw them. This is because storyboards usually take around 3 weeks to do for a normal length TV-anime episode. Art meetings and production meetings are held with the episode director, series director and other staff about the episode should look. Storyboards are drawn on A-4 paper (generally) and contain most of the vital building blocks of an anime – the cut numbers, actor movements, camera movements such as zooming or panning, the dialogue (taken from the screenplay) and the length of each shot (or cut) in terms of seconds and frames (which we’ll explain later). Because the number of drawings available for an episode is often fixed for the sake of budget management, the number of frames is also carefully considered in the storyboards. The storyboards are roughly-drawn and are really the core stage of deciding how an anime will play out. Cuts refer to a single shot of the camera and an average TV-anime episode will usually contain around 300 cuts. More cuts don’t necessarily imply a better quality episode, but it will generally mean more work for the director/storyboarder.


Example storyboards from To Aru Kagaku no Railgun. Anime storyboards have 5 columns. From left to right: the cut number, the layout, the action, the dialogue, and finally, the running time (in time and frames). The layouts are only drawn roughly, because they are handled by other artists in the next step of production.
Layouts:
Less well known is the layout process, which marks the beginning of art production. In simple terms, developing a layout is about positioning the cels that will be used in the cut and the background art that will be needed, giving the definitive blueprint for how the final shot will look. The cuts are drawn up to the same size as the animation paper and the details of cel placement, precise descriptions of camera movement, and other decisions are included. In collaboration with the director, and possibly producers, the senior animators draw the layouts (or sometimes staff are specifically credited with layout drawings) and the shots are called about where the cels/characters are going to be situated and the way a cut is going to be framed. The basic structure of the background art is drawn in (ie. a tree here, a mountain there), and elements of the storyboard are expressed on the layout to help describe the cut. Sometimes multiple stages of the storyboard can be expressed on a single layout drawing as long as it isn’t too confusing. Cels are shaded in warm colours, backgrounds are shaded in cool colours.
After being approved by the director, these layouts are then duplicated and given to the background department (who get the originals), and the key animators. The art director and assistants work on painting the background artwork based on the rough drawings of the layouts while the rest of the production process continues concurrently.
Now the form of each cut has been decided – the positions of characters, the setting, what they’re going to do, and how the shot is going to be captured (camera angle, zooming and panning). But one of the most expressive and vital parts of production remains: the animation!

Black Rock Shooter Layouts. The cels are shaded a warm orange, while the background a cool blue colour.
Animation:
To its credit, anime is one of the few places left that you can still find ‘traditional animation’! I think there has been some confusion among many anime fans about just how digital anime production is, so I’d better make it clear: commercial, mainstream anime is still fundamentally hand-drawn, and that’s why it remains such a great artistic medium! Traditional animation allows for more individuality to be expressed. Sure, computers do come into it in a large way (and I’ll explain that a bit later), but the crucial thing is that the frames are still initially drawn by hand, and no in-between animation is simulated by a computer. There are some animators who draw 2D animation directly onto computer, but in anime this is largely restricted to in solo animation productions rather than commercial anime. The industry prefers this because the animators are generally more comfortable and able with this method, and it allows easier checking and correction of frames under sometimes tight schedules. Here’s how the animation is done:
Key Animation:
Based on the storyboard, the key animators start work, creating the animation drawings. They are assigned a certain number of different cuts by the person in charge of key animation. Key animators draw the essential frames that mark a distinct position or expression of a cel/character. For example, a character starting to kick someone as one key frame, and then the kick landing as the second key frame (if it’s a fast kick!). In other words, they draw the structure of the animation. The number of frames that a key animator draws for a movement will depend upon the intentions of the key animator and the nature of the cut, with time, and budget constraints considered. These drawings also include lines which direct where shading will occur. Around 20 key animators can be working on a single episode of anime, each in charge of a separate part (sometimes several cuts). Although it’s already decided what a movement will be, it is up to the key animator to express that as animation. That is why a talented and hard-working key animator can really steal the show, going well beyond the requirements of the storyboard and imbuing a scene with their own style. Some animators get the opportunity to deviate from storyboards as well (which the likes of Yoshinori Kanada was known to do, to great effect).
There is a subset of the anime fandom who are enthralled by great animation works and animators, ‘sakuga’ fans. Sakuga technically refers to the drawings in an anime, but is extended to describe the animation as a whole. People follow their favourite animators, and keep track of the cuts they do, also compiling them into anime or animator-specific music videos. The core of the sakuga online fandom is the ‘sakuga wiki’ (in Japanese), and a huge array of ‘sakuga AMVs’ can be found on youtube. Even a brief look over these videos inspired me with a real appreciation of the character and presence that individual animators can impart. I think this culture of appreciatimh outstanding key animation is one of the most fascinating arenas of the anime domain.
2nd Key Animation is also emerging lately, but I’m not too clear on what this means (if anyone can explain, please do!)
(Hironori Tanaka MAD)
But what about consistency? While emphasis on this varies from production to production, in general it is a good idea to make sure your characters look the same from one key animator’s portion to the next. This is handled by an animation director.
Animation Director:
This is one staff role that I suspect many anime fans haven’t learned about, because it’s not very self-explanatory. The animation director’s key role isn’t to ‘direct the animation’ per se (although they have varying levels of input depending on the person, studio and schedule). Their position is basically about consistency. They check all the key frames being created for an episode and make corrections where necessary so that the drawings are as close to the models for the series as possible. In some cases, they may have to redraw entire frames, or make adjustments to timing and movement (mostly, this happens for OVAs and movies). They are one of the four core staff positions for an episode (screenplay, episode director, storyboard, animation director). Key frames may also be checked by the episode director.
Animation directors tend to be more experienced animators and are paid more for the role. However, it is their responsibility if things go wrong with the animation, making it a potentially very stressfulJOB , especially under time pressure. Often, an episode of anime will have more the one animation director, and this can be a sign of scheduling problems, with more people needed to complete the episode satisfactorily and on time, or even a sign of many poor drawings needing correction. It can also be because animation directors are being used to their specialties (ie. an animation director brought on to handle a mecha sequence, or to handle drawings of animals), or an indication that it was a difficult and demanding episode with a lot of drawings.
Other than the episode animation director, anime nowadays have an overall animation director (generally also the character designer), who often works alongside episode animation directors to keep the character models consistent throughout the entire show. They generally focus on the faces of characters. Some series place less importance on this, or, as was the case with Noein, didn’t use a series animation director at all!
In-between Animation:
We have our approved key-frames for a piece of animation, but now to complete the animation, so that it moves fluidly, more drawings have to be completed to go between the key frames. This is called in-between animation. In-between animation is handled by less experienced animators, and is very often outsourced (largely to Korea). In-between animation is paid more poorly than key animation, and is usually only a temporary position in an animator’sCAREER. You could describe this as grunt work, because in-between animators don’t have a chance to imbue their work with individuality. They receive (particularly when it’s oursourced), clear instructions from the key animator about what the in-between animation should do, and simply fill in the gaps with drawings. They also have the task of neatly tracing the key frames.
Often key animators, particularly famous ones, or for important sequences, will do many of the drawings themselves, to minimise the number of potentially inferior in-between frames. There are many examples of this, but one of my favourites is Yoshimichi Kameda’s sequence from FMA:Brotherhood in which Mustang is burning Lust, for which he did all the in-between frames himself. I doubt frames drawn by other people could have matches his impressive drawings for that scene!
The in-between frames are also checked/corrected if need be. With the drawings from the key animators and in-betweeners combined, you have the ‘animation’ that goes into an anime!

Gurren Lagann animation. Top: key animation drawings, middle: cleaned and in-between animation, bottom: final product, coloured and including background artwork.
Generally, especially for TV, anime will be animated at 2:s, which means 1 drawing lasts for two frames (equating to 12 drawings per second), but sometimes animation is done at 1:s (24 frames every second) or 3:s. If every second of an anime was animated at even 2:s that would involve using around 15000 drawings for an episode! In reality, because many shots have cels as static, or because many scenes don’t necessarily require fluid movement, the average anime will have around 3000 frames/drawings. That’s still a lot of drawings! Often (especially lately), directors or producers will boast that their anime has “10,000 drawings for an episode!” or something to that effect, which is fairly impressive but doesn’t necessarily mean the episode is better. For example, apparently the first episode of Evangelion used only 700 animation frames, while Angel Beats used around 11,000 in episode one! A good director can work wonders with fewer frames using interesting scene compositions and shortcuts. Often, directors or studios will manage their budget by putting a limit on the number of drawings that can go into a single episode.
Another core factor is the trade-off between detailed, consistent designs and more fluid animation. You can see how faster animation drastically increases the number of drawings required, and sticking to detailed character models can be expensive and time-consuming. Fluid animation is easier to do with simpler designs OR if the requirements for consistency are less strict. With fairly tight budgets, the anime medium has long been a struggle to balance these issues with shortcuts and compromises. This truth is the basis for a lot of attack on anime from Western animation fans, but the fact is, with skilled enough animators and the right project you can have your cake and eat it too! Anime has certainly produced some of the most detailed AND fluid animation sequences you’ll be able to find!
Compositing / “filming”:
It is commonplace for the frames to be completed on a computer. After they are drawn and checked, they are digitized. Once they are on the computer, they are painted with a specified color palette by painting staff (generally a low paidJOB). They use the shading lines drawn by the key animators to do the shading colours. This digital equivalent of the ‘ink & paint’ stage of production, which used to be done by hand, has allowed some more interesting visual styles to come through in the colouring, such as the use of gradient shading or even textures. These would have been too difficult to do back in the day. It has also saved considerable time and money in the process. These become the final “cels” that go into the animation.
Once all the frames are coloured and finished, they can be processed as animation using a specializedSOFTWARE package. “RETAS! PRO” is used for approximately 90% of anime currently aired in Japan (for drawing sometimes too)! Before the use of digital ‘cels’ (digicels), drawings (printed onto cels) were actually filmed over backgrounds. Now, cuts are completed digitally, and the background art can be added on the computer. Initially, when digicel was first being picked up by studios (around about 2000), it had real problems matching the fineness of detail in hand-drawn and painted cels. But nowadays, anime studios have really perfected the digital cel, giving us anime with just as much detail and more vibrant colouring. The digicel age has now streamlined the production process such that repeated cels and clip/recap episodes are basically a thing of the past. Some still prefer the rougher look of pre-2000, but I’ve certainly moved on.
While it doesn’t use actual film, the compositing process of adding background art and capturing the animation digitally is still referred to as “filming”. The CG characters and machines are also generally added to the composition during the filming stage. The use of 3DCG is also now common-place in anime now for mechanical things, like mecha, cars, or even background characters. Its role is expanding and becoming less and less intrusive. During compositing, the effects are also applied to the cuts.
Effects! This might sound like a trivial thing when you’re talking about anime, but it can be a vital component of the visual style of a series because it incorporates basic things like ambient lighting, flare, backlight, the glint on a sword, blur, and many other things integral to giving depth and atmosphere to 2D drawings. Then there’s all the flashy things you’d usually think of when someone mentions special FX – magical attacks, explosions and the like. These are typically hand-drawn but then rendered with effect CG for their glow/shine. These effects can be simply added to the compositions using digital masking. The ease of this step now has resulted in one of the biggest distinctions between anime a decade ago and the anime of today.
In short, the digital age of anime (in most cases) has meant several things: physically filming cels is replaced by computer-based composition of the hand-drawn frames/art, painting no longer has to be done by hand, and the more effective integration of CG and digital effects. All of these things have saved time and money, so that TV-anime now use many more drawings and don’t need to recycle cels or have clip/flashback episodes.
After compositing is completed for all the cuts, they have to be to the timing required for broadcast, so that the episode doesn’t lag overtime. With the completion of the editing step, the episode moves out of production and into post-production. I won’t go into much detail on this, but it essentially encompasses adding sound (dubbing), both the music and the voice recordings, and final editing (cutting the episode with space for advertisements). Visual effects may also be added at this late stage too.
(Raw genga Birdy Part 3: Shingo Yamashita & Ryouma Ebata )
Japanese terms:
Animation Director: Sakkan (Sakuga Kantoku) [作画監督]
Drawings of anime: Sakuga (作画)
Key Animation: Genga (原画)
In-between Animation: Douga 動画
Overall Animation Director: Sou-Sakuga kantoku (総作画監督)
Drawings of anime: Sakuga (作画)
Key Animation: Genga (原画)
In-between Animation: Douga 動画
Overall Animation Director: Sou-Sakuga kantoku (総作画監督)
Sources for this post:
PRODUCTION I.G – Tokyo, Anime production process – feature film link
Steps in Anime Production link
Wao’s highly informative posts on anime staff on Animesuki! link
AIC – :: Introduction of anime production :: link
Sunrise – The Making of Animation: link
Nurse Witch Komugi omake on anime episode production:
Digital Paitning on Tonari no 801-chan


Comentarios
Publicar un comentario